Friday, January 20, 2023

Battle Chopper (World) - MCU decapped

I received this MCU for Battle Chopper today.


The decap-process worked without any problems and within some minutes i had the internal rom dumped.

Another long missing MCU is now preserved.

Thx to Ordyne & rtw


Saturday, January 14, 2023

Sega ST-V cartridge dumper v0.1

 This is in no way a finished product and the PCB will not be available for the next few months! I only wanted to show that this exists and that i'm working on it.

I already dumped a couple of Sega ST-V carts some years ago. But that always meant to desolder the flashroms and dump them with an selfmade Arduino-dumper one by one...and some flashroms (on the bottom side) have even a mirrored pinout which is not support by any dumper ...and even if you had dumped all flashroms you had to solder the flashroms back to the PCB, which is another pain work...and sometimes even fails!

So when i got a new undumped cartridge from Darksoft a couple of weeks ago, we were thinking, that it would be a good task to make a cartridge-dumper for the ST-V system...that way the dumping process would be so much easier.

My first attempt looked promising, but always only the first three flashroms of the cartridge got dumped, over and over again, but never the other chips...after alot of tracing i was pretty sure, the problems are the PALCE chips, which control the CE, OE of the chips.

Darksoft also confirmed my theory with his notes about this.

So i wrote an Arduino program, which stepped threw all 64 possible combinations and always dumped the 2MB of available data between them. This worked! But i had a dump of 64 x 2mb, with a couple of empty roms, and some duplicates.

Afterwards i could downsize the combinations and now this dumper can dump all soldered flashroms of the PCB directly.

This is version 0.1, which dumps the data in an serial stream to the PC:


Version 0.1 is working perfectly for dumping, but has some design-flaws. 

So Version 0.2 is already in the works, which will remove the design flaws and will most likely add support for a small Display (showing which flashrom is currently dumping) and i will most likely also add an SD-Card Slot, so you can dump the flashroms directly to an SD-card.

Even with version 0.1 we now have already an pretty easy way to dump ST-V carts! So stay tuned for updates about Version 0.2!

The Arduino-Board is pretty simple, uses standard parts and so all parts (even for v0.2 with the display and sdcard-slot) will only cost about 8eur. Take an cheap chinese Arduino MEGA clone...and for about 20eur, everyone can then dump ST-V carts!

IF YOU HAVE AN UNDUMPED ST-V CART, CONTACT ME! :-)

thx to Darksoft and Brizzo for the help!

Preserving games - Anybody can now do it! #2

 In April 2020 i already posted about my Arduino Mega Shield v0.5, which supported cartridges from 10 Systems. This already got made a couple of times around the world and new V.Smile dumps from the US, France and UK got made with it!

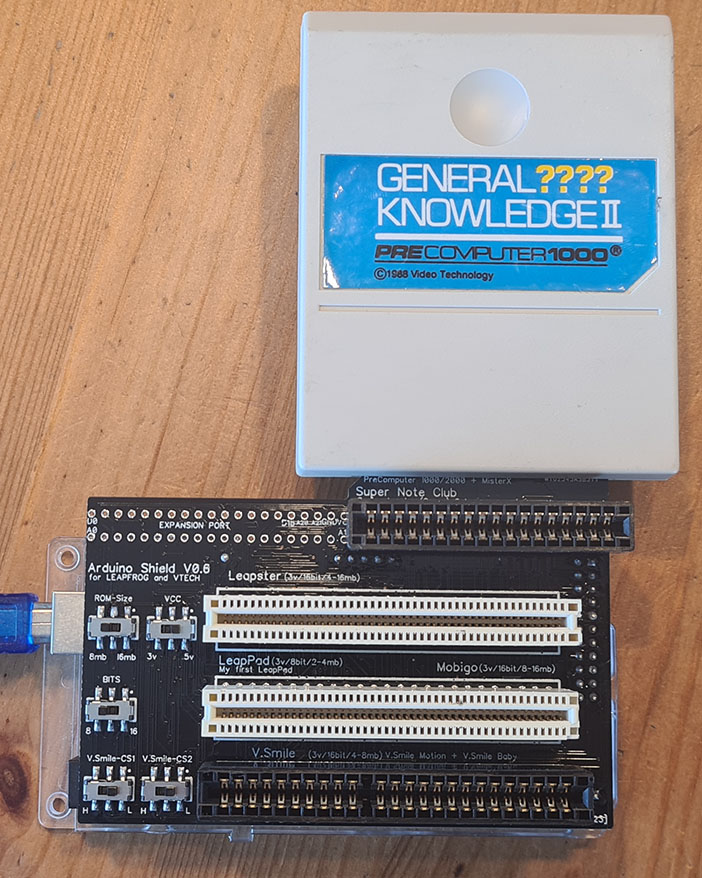
The last couple of months i invested some time into the PCB and now i'm proudly presenting version 0.6 from the board.

V0.6 adds support for cartridges from Genius Leader Color, Genius Leader Super Color, Bandai Super Note Club, PreComputer 1000 / 2000, Mister X and Genius Leader 2000.

Full List of Supported cartridges:

  • Vtech V.Smile
  • Vtech V.Smile Motion
  • Vtech V.Smile Smartbook
  • Vtech V.Smile Baby
  • Vtech MobiGo
  • Leapfrog Leapster
  • Leapfrog Leapster L-MAX
  • Leapfrog LeapPad
  • Leapfrog LeapPad (My first LeapPad)
  • Leapfrog LeapPad (Little Touch)
  • Vtech Genius Leader Color
  • Vtech Genius Leader Super Color
  • Bandai Super Note Club
  • PreComputer 1000 / 2000
  • Mister X
  • Genius Leader 2000 

In the last couple of years we also saw a couple of Vtech V.Smile cartridges, which were not supported with the 0.5 version of the board, this got solved with v0.6.

V0.6 also got an "Expansion Port", which can get used for future support of other systems. 


The board itself is pretty basic and has only five switches for Voltage, Bits, Romsize and special switches (CS1 & CS2) for V.Smile (more on that later).
It uses two PCI- and two standard 2.54mm edge-sockets for the cartridge-slots.

Dumping takes about 45seconds per megabyte which will be about 6minutes for an 8mb rom.

IMPORTANT: ALWAYS DUMP EACH GAME AT LEAST TWO TIMES, WHILE ALSO TO UNPLUG AND REPLUG THE CARTRIDGE BETWEEN BOTH DUMPS! TO CONFIRM THAT THE DUMP IS GOOD, BY COMPARING THE CRC's FROM BOTH DUMPS!

THIS IS REALLY IMPORTANT, AS A BAD DUMP IS USELESS, LIKE TO HAVE NO DUMP!


Let's see how to insert the cartridges into this dumper...(i used some pictures from v0.5, but this is the same for v0.6!)

V.Smile / V.Smile Motion / V.Smile Baby / V.Smile Smartbook


Switch-Positions:

VOLT: 3
BITS: 16
ROM-Size: 8
V.Smile-CS1: L
V.Smile-CS2: L

You can dump the cartridges directly by putting it into the black slot at the bottom. While i would highly recommend to also open the cartridge so you can also document the PCB of each game. At least in german-europe alot of different game-revisions got released for the V.Smile, most times you only could see which revision it is, on the pcb itself.

Explanation of the CS1- and CS2-Switch:
While most V.Smile carts only have one chip inside the cartridge and therefore a maximum size of 8mb, some of the games have two chips inside the cartridge. Older (first releases) games had for example two chips inside. One with 4mb and one with 2mb, so these games have a size of 6mb. The last few released cartridges on this system needed more space for the games, that way they used two 8mb chips inside the cartridge, therefore these games are 16mb. (for example Toy Story 3)
 

For old releases you need to get the 4mb chip dumped with CS1 to L and CS2 to L. For the second 2MB chip you need to set CS1 to H and CS2 to L.

For the 16mb games (Toy Story 3) you need to set CS1 to L and CS2 to L for the first 8mb. For the second 8mb you need to set CS1 to L and CS2 to H.

Don't forget to set both switches back to L after you finished dumping the game!!


LeapPad / My first LeapPad / LeapPad Little Touch


Switch-Positions:
VOLT: 3
BITS: 8
ROM-Size: 8
V.Smile-CS1 & CS2: L
To get the cartridges dumped, you have to open it. As only the bare PCB fits inside the socket. Insert it like on the picture above, with the glob pointing away from you. It's the middle socket on the left side.
Always check that the cart-edges fit to the pins of the socket, starting from PIN1 on the left of the socket!

Leapster / Leapster L-MAX


Switch-Positions:
VOLT: 3
BITS: 16
ROM-Size: 8 or 16
V.Smile-CS1 & CS2: L
To get the cartridges dumped, you have to open it. As only the bare PCB fits inside the socket. Insert it like on the picture above, with the glob pointing to you. It's the top socket on the left side.
Always check that the cart-edges fit to the pins of the socket, starting from PIN1 on the left of the socket!


Genius Leader Color / Genius Leader Super Color / Bandai Super Note Club


Switch-Positions:
VOLT: 5
BITS: 8
ROM-Size: 8
V.Smile-CS1 & CS2: L


The cartridges for these systems are completely the same. Just insert it like show in the picture above and dump it. 


PreComputer 1000/2000 / Mister X / Genius Leader 2000


Switch-Positions:
VOLT: 5
BITS: 8
ROM-Size: 8
V.Smile-CS1 & CS2: L


The cartridges for these systems are special! Vtech did put two games in every cartridge! They used a 128kb chip inside each cart and with directly soldering the highest addressline of the chip to GND or VCC, they selected the lower or higher half 64kb of chip. So if you dump it, you will only get 64kb (one game).
But with an very easy modification of the PCB, you can dump the full 128kb. Afterwards you just can undo the modification and the cartridge works like before! You can even choose, if you want to activate the second game ;-)

Modification of the cartridges to get the full 128kb data dumped:

1. Cut/desolder on the red markings (so you removed the connection of the highest addressline with GND or VCC) and solder the two pins (marked in yellow) together:
Also check the other side of the PCB, sometimes they connected the pins with wires on the other side. Just remove/cut them:
 

 2. That way you have modified the cartridge, so the highest addressline is now connected to the cart-edge...and the Arduino Mega Shield will read the full 128kb from it.


3. After dumping you can desolder the YELLOW connection and just solder a connection to GND or VCC. (like it was before). NEVER solder a connection to VCC and GND at the same time, it will most likely destroy your console or cartridge!


MobiGo


Switch-Positions:
VOLT: 3
BITS: 16
ROM-Size: 16
V.Smile-CS1 & CS2: L


The Mobigo is kinda special! As they released two different game-cartridge-pcb-revisions and you can only dump one revision with this Arduino dumper. (More on that fact below!)
Insert the cartridge with the glob pointing away from you, inside the middle slot on the right side.

Different cartridge-pcb-revisions of the MOBIGO:

So far we found two different pcb-revisions. You can see the different revision already when you open the cartridge. One revision has the glob on the top, the other revision as the glob on the underside.
One revision has the marking "128mb&64mb mask rom"...the other not.


While the cartridge-pinout is completely the same (logical, as otherwise it would not work on the console ;-) ), only the right cartridge-revision can get dumped with the Arduino Mega Shield. The other revision gives inconsistent reads on the Arduino. (And we don't know why!)

But i have also found a solution for the left cartridge-revision!

Mobigo - Save-Cart and other Cartridge-Revision adapterboard:

HIGHLY IMPORTANT: Only the cartridges with the marking "128mb&64mb mask rom" are dumpable with this adapterboard. The other revision will give you inconsistent reads with this setup!

I designed this board to get the Save-Carts and the other Mobigo-Cartridges dumped with an cheap TL866IIPlus programmer and you will also need the TSOP48 v3 board. The programmer costs about 35EUR and the TSOP48v3 baseboard will cost you about 10EUR.

TL866IIPlus and the TSOP48v3 base board. Both needed.
TL866IIPlus - Dumping Adapter
This Adapter-Board for the Tl866IIPlus has two positions how it can get used with the TL866IIPlus.

Let's see how to use it with the second cartridge-revision (128&64mb mask rom) of the Mobigo-Game-Carts:

Mobigo-Cartrige inside the Adapterboard, which is on top of the TSOP48v3 base board and inside the TL866IIPlus


Insert the Mobigo-Cartridge inside the adapterboard (like on the picture above) with the glob pointing away from you, on the right side of the slot. Put the adapterboard on the TSOP48v3 base board and insert everthing on the TL866IIPlus.

Inside the TL866IIPlus programmers-software select the IC 29GL064A10TFIR3 (IMPORTANT: select exactly this IC-Type!!), check that the two switches (A22 and A23) on the board, that both are positioned at LOW and click on READ inside the software.

You will get the following Pin-Detect-Error with 5 Pins not detected, which is completely OK and just shows that the cartridge is insert correctly! (If you have more than 5 Pins not detected, something is wrong with your setup, or cartridge wrong insert into the slot!)

Hit Cancel and deselect Pin Detect and Check ID at the Options at the bottom.


Now click again on READ to dump the cartridge, it should read now without problems and you should get an 8mb file afterwards!

Mobigo-Games are 16mb, so we need to change the A22-switch on the board to HIGH and dump the cartridge again with the same procedure, which will get us a second 8mb file!
Afterwards just concatenate both dumps and you have the real 16mb rom.


How to dump the Mobigo SAVE-Cartridge:
The Mobigo got an special SAVE-Cartridge released, which has 128mb of space for downloaded/bought games from the Mobigo-Online-Store. These carts use an NAND chip, and to our luck it's a very common NAND-Chip which is supported by the TL866IIPlus.

Normally you would need the special NAND-Chip adapter for the TL866IIPlus to get the NAND-Chips supported, but i already included this adapter inside this board.

Remove the TSOP48v3 board from the Mobigo-Adapter-Board and insert the board with the 40 Pins to the TL866IIPlus.
Insert the cartridge, like on the picture above, into the socket.

Select the IC TC58NVG0S3ETA00 inside the programmers software and click on READ, the chip should be detected and no errors should happen.
Afterwards you have an 128mb dump of your NAND-Chip.

Basically you can also program this SAVE-Cartridge with this method.